x

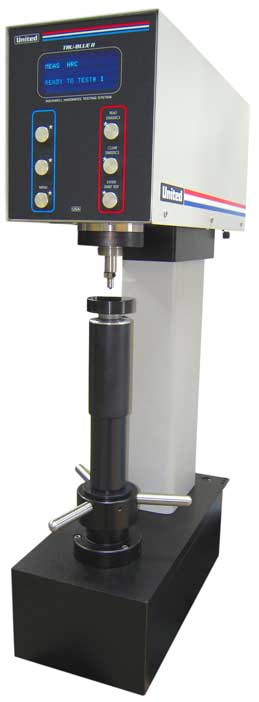
Tru-Blue II Digital Rockwell and Superficial Hardness Tester
Tru-Blue II Digital Rockwell and Superficial Hardness Tester

Tru-Blue II Digital Rockwell and Superficial Hardness Tester

Regular price $0.10 $0.10 Sale

Meets the new ASTM E 18 Specifications

The Tru-Blue II is a state-of the-art digital hardness tester that meets the strict requirements of the ASTM E 18 revisions. The Tru-Blue II provides users with pin point precision, superior accuracy, dependability and a closed loop system traceable to NIST.

Features

  • Computer controlled testing with digital closed loop control of load cell force applications.
  • Regular Scales: A, B, C, D, E, F, G, H, K, L, M, P, R, S, and V.
  • Superficial Scales: 15N, 30N, 45N, 15T, 30T, 45T, 15W, 30W, 45W, 15X, 30X, 45X, 15Y, 30Y, and 45Y.
  • Loads in kg.: 150, 100, 60, 45, 30, 15, 10 & 3.
  • 5-preset load application dwell settings including a NIST recommended dwell time.
  • Plastics dwell time setting per ASTM D-785.
  • Statistical information: Average, Range, Standard Deviation, High, Low, and Number of Tests.
  • Selectable auto-correction of hardness values for cylindrical parts.
  • Built-in ASTM E-140 Conversion Charts and ASTM A-370 Tensile Strength Values.
  • Parts Good/ No Good settings with audible and visual alert.
  • Printable data entry via external 88-104 PS/2 keyboard.
  • 9 pin RS-232 Interface Port.
  • 25 pin Parallel Printer Port.
  • Bi-directional load application via elevating unit or control panel.
  • Machine uncertainty excluding test block and indenter variations less than 0.1 point corresponds to 3.3 % GR&R for a 3-point tolerance.
  • 4x20 Bright Vacuum Fluorescent display.
  • 6-front panel controls consist of Piezo-Electric switches.
  • Auto self-test and last test setup recall at startup.
  • Removable Parts Clamp, which can be used to secure irregular shaped or oversize parts.
  • 20 bit analog to digital converters for force and depth measurements.
  • Co-Axial mounting of Force and Depth transducers.
  • Logical setup and operating menu from front panel keys.
  • Manual, Hex Driver for indenters and Power Cord.
  • 4-1/2-20 threaded holes for securing testers base to mating surface.
  • Factory Certificate for Direct Verification of: Load, Depth, Hysterisis and Dwell Timing.
  • 2-Year Factory Warranty.
  • CE Certified.
  • POWER REQUIREMENTS: 110/ 220VAC 50/60 Hz 1 Phase 2 AMP.
  • DIMENSIONS: 8''W x 20''D x 33.5''H for the 10, 37.5H for the 14 and 41.5 for the 18.APPROX WEIGHTS: 185 lbs. (/10), 195 lbs. (/14), 205 lbs. (/18).


Call for Quote

We will beat any advertised price


Since 1984, United has manufactured computer-controlled closed loop Rockwell testers. Our second generation Rockwell tester, the Tru-Blue II is the lowest priced US manufactured closed loop tester that meets ASTM E18, ISO 6508 specifications and NIST recommendations. The Tru-Blue II comes standard with a direct certification of the hardware calibration with NIST traceability and a one-year indirect calibration for customer specified hardness scales. Along with a user friendly control panel, the tester can be put into operation without the need for an initial on-site calibration or manufacturer's assistance! Having no dead weights, pivot points and knife edges to move out of adjustment, the Tru-Blue II can be moved to a new location without having to be re-calibrated. When mounted on United's optional mobile stand, the Tru-Blue II becomes portable for use in different departments.


The importance of NIST Traceable Closed Loop Testing


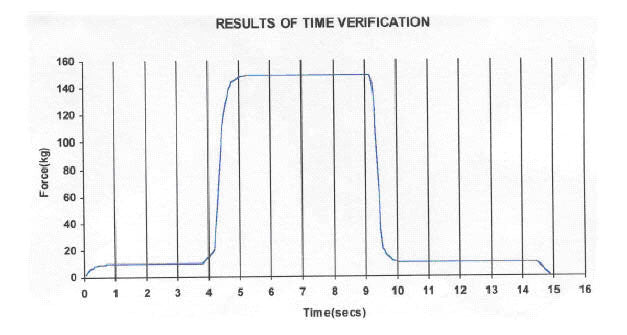
A TRUE "CLOSED LOOP" hardness testing system like the Tru Blue II, offers a good sound approach for performing tests and virtually eliminating operator influence. This tester precisely controls all aspects of the test cycle. In addition to providing uniformity of testing, it provides the ability to automatically and electronically record each hardness test. Test reporting and data acquisition is accomplished by a printer and/or an IBM compatible computer. Using United's proven computer storage technology, records are easy to maintain and access. Like most of the mechanical testers made in the United States from around 1930 to recent years the United Tester can not have its calibration altered in the field, making it highly reliable and trustworthy. Below is a graph indicating the precise loading operations at HRC.