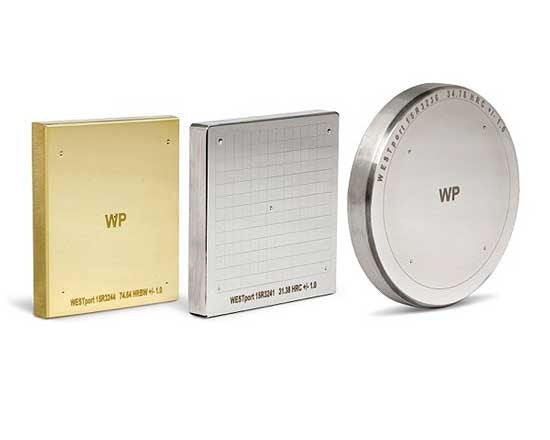
Superficial Rockwell Test Block
- Calibrated to ASTM E18, ANSI (NCSL) Z540-1, (ISO) 10012-1, ISO/IEC 17025, ISO 6508
- Lifetime Guarantee
- Highest quality steel, brass and aluminum
- Rockwell test block surface hand lapped and diamond polished to a mirror finish
- Superior accuracy and ease of testing for the operator
- Special heat treat process insures maximum consistency and repeatability
- Rockwell Test Blocks are certified in our ISO/IEC 17025 accredited laboratory
- In stock for immediate delivery
- Free NIST traceable long form certificate with every Rockwell test block
- Rockwell Test Blocks are provided within a range of +/- 5 points
Certification Certificate Sample
View ISO Scope and Certificates
| PART # | DESCRIPTION | RANGE | PRICE | SALE PRICE |
| HR15N 88 | Rockwell 15N Scale Test Blocks - 88 | 88.0 | $112.00 | |
| HR15N 91.5 | Rockwell 15N Scale Test Blocks - 91.5 | 91.5 | $112.00 | |
| HR15N 83 | Rockwell 15N Scale Test Blocks - 83 | 83.0 | $112.00 | |
| HR15N 72 | Rockwell 15N Scale Test Blocks - 72 | 72.0 | $112.00 | |
| HR15N 78 | Rockwell 15N Scale Test Blocks - 78 | 78.0 | $112.00 |
Rockwell Test Blocks manufactured in accordance to the latest Rockwell E18 Revision
Rockwell hardness testing is a fast and inexpensive test. The simplicity in the operation of a Rockwell hardness testing machine provides the added advantage that Rockwell hardness testing does not generally require a highly skilled operator to perform. The test is useful for material selection, for process and quality control, and for acceptance testing of commercial products. Rockwell hardness scales are divided into two categories: regular Rockwell scales and superficial Rockwell scales. Both categories of tests use the same types of indenters. The regular Rockwell hardness testing scales use heavier force (load) levels. For these scales, the preliminary force (minor load) level is 10 kgf and the standard total force (load) levels may be 60 kgf, 100 kgf or 150 kgf. The superficial Rockwell hardness testing scales use lighter force (load) levels, typically for use on thinner materials. For the superficial Rockwell scales, the preliminary force (load) level is 3 kgf and the standard total force (load) levels may be 15 kgf, 30 kgf or 45 kgf. The Rockwell hardness test method consists of indenting the test material with a diamond cone or hardened steel ball indenter. The indenter is forced into the test material under a preliminary minor load F0 (Fig. 1A) usually 10 kgf. When equilibrium has been reached, an indicating device, which follows the movements of the indenter and so responds to changes in depth of penetration of the indenter is set to a datum position. While the preliminary minor load is still applied an additional major load is applied with resulting increase in penetration (Fig. 1B). When equilibrium has again been reach, the additional major load is removed but the preliminary minor load is still maintained. Removal of the additional major load allows a partial recovery, so reducing the depth of penetration (Fig. 1C). The permanent increase in depth of penetration, resulting from the application and removal of the additional major load is used to calculate the Rockwell hardness number.
Best Practices for Rockwell Hardness Testing
- The indenter and anvil should be clean and well seated
- The surface to be tested should be clean and dry, smooth, and free from oxide. A rough-ground surface is usually adequate for the Rockwell hardness test
- The surface should be flat and perpendicular to the indenter
- Tests on cylindrical surfaces will give low readings, the error depending on the curvature, load, indenter, and hardness of the material. Theoretical and empirical corrections for this effect have been published
- The thickness of the specimen should be such that a mark or bulge is not produced on the reverse side of the piece. It is recommended that the thickness be at least 10 times the depth of the indentation. The spacing between indentations should be three to five times the diameter of the indentation. Rockwell hardness test blocks are designed to be used only on one side and the indents no closer to the block's edge than .040"
- The speed of application of the load should be standardized. This is done by adjusting the dashpot on the Rockwell hardness tester. Variations in rockwell hardness can be appreciable in very soft materials unless the rate of load application is carefully controlled
Typical Application of Rockwell Hardness Testing Scales
- HRA - Cemented carbides, thin steel and shallow case hardened steel
- HRB - Copper alloys, soft steels, aluminum alloys, malleable irons, etc.
- HRC - Steel, hard cast irons, case hardened steel and other materials harder than 100 HRB
- HRD - Thin steel and medium case hardened steel and pearlitic malleable iron
- HRE - Cast iron, aluminum and magnesium alloys, bearing metals
- HRF - Annealed copper alloys, thin soft sheet metals
- HRG - Phosphor bronze, beryllium copper, malleable irons HRH . . . . Aluminum, zinc, lead
- HRK - Phosphor bronze, beryllium copper, malleable irons HRH . . . . Aluminum, zinc, lead
- HRL - Phosphor bronze, beryllium copper, malleable irons HRH . . . . Aluminum, zinc, lead
- HRM - Soft bearing metals, plastics and other very soft materials
- HRP - Soft bearing metals, plastics and other very soft materials
- HRR - Soft bearing metals, plastics and other very soft materials
- HRS - Soft bearing metals, plastics and other very soft materials
- HRV - Soft bearing metals, plastics and other very soft materials


